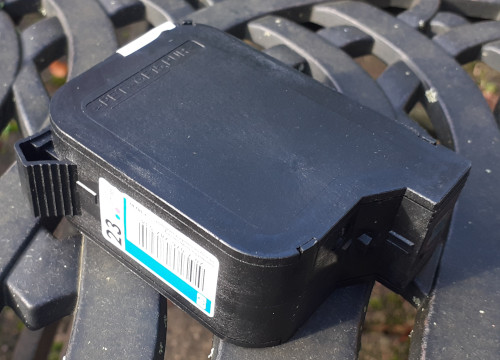
HP-23 inkjet cartridge teardown
11 November 2023Last year I pressed an old DeskJet 710C into service using remanufactured ink cartridges and with the colour cartridge running out of ink it was time to replace it, but three replacement HP-23 cartridges ordered in all had problems that could not be rectified with various fixes which I put down to them being obsolete models that had been sitting on shelves for too long. Rather then returning them all as dud I decided to do a teardown to see what this cartridge model was like on the inside, and having seen it I decided to try out a potential fix for the one ink channel I could not get working. I had intended to do this weeks ago but since I knew it would be messy it had to wait for a dry day.
Basic fix techniques
Multiple variants on the basic technique exist but the most common suggestion for unblocking the print head is to soak it in one-centimeter deep warm water for around half a minute and then drag the print head along some absorbent tissue; this procedure is then repeated until all three colours leave a trail. One variant is to press the print head into a damp cloth rather than soak the whole print head. If this dip-and-drag technique does not work I found that leaving the print head soaking for several minutes and using iso-propyl alcohol does not make any difference.
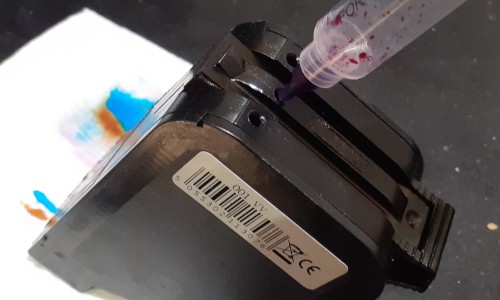
The next fix is to use pressure to unblock the print heads, which ideally would be done by suction on the print head itself but without a suitable adapter this instead has to be done by forcing air into the cartridge. First thing to do is to open up filling holes on top of the cartridge which can be done by pushing the plugs inward, although if the cartridge is a remanufactured one where they have re-sealed the holes you may end up having to drill them out instead. Next step is to jam a dry syringe all the way down into the hole so that the end seals around the hole and then press the plunger down; it should not take much force for ink to start flowing out of the print head.
One thing I observed with using pressure is that it worked for the cyan and yellow inks in the side chambers but not the central magenta chamber, which made me suspect it was subtly diffferent in a way that made it more prone to blocking. The outcome of the teardown was a technique for unblocking this central ink channel.
Post-mortem time
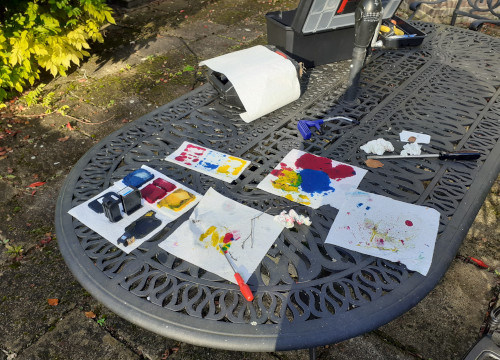
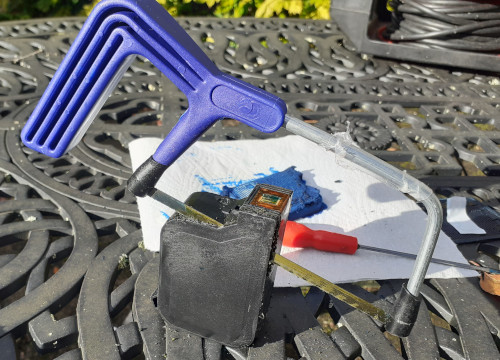
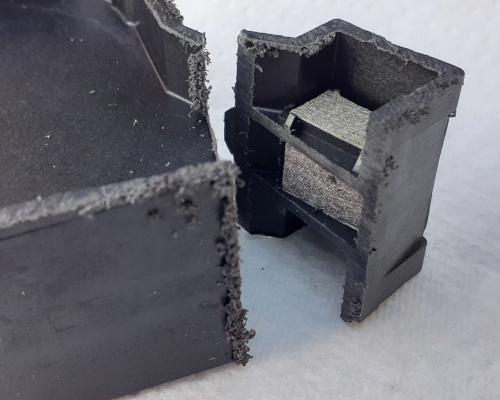
I knew that opening up the ink cartridge would be messy so I decided to do it out in the garden over in Berkhamsted rather than my flat in London, and in hindsight this was a good call because the ink soaked through even the multiple layers of tissue I had laid down — this would have easily stained the wood table and floor on my balcony. The original approach was to try and force open the end panels but it quickly became apparent that they were fused together so they had to be cut open, and since the spanner for the Dremel was nowhere to be found within the tool-box the small hacksaw was used instead — probably for the better as the Dremel would have likely splattered ink all over the place.
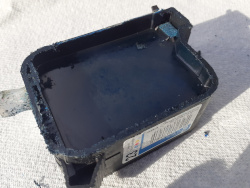
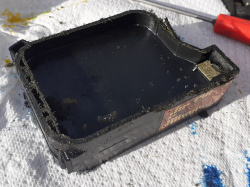
The ink chambers The first cuts were to take off the side panels in order to get access to the left-hand and right-hand chambers which contained the cyan and yellow inks respectively. At this stage I had no real idea what would be inside and how it was positioned, and being a supposedly fill cartridge was unsure how messy it would be and how quickly. The two pictures below show what the cyan chamber looked like when it was finally opened, and then the yellow chamber that was opened afterwards. I do not know whether the apparent pattern on the sides of the sponges is of any importance I suspect that it is not.
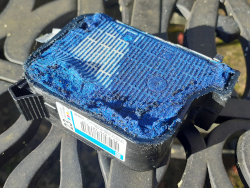
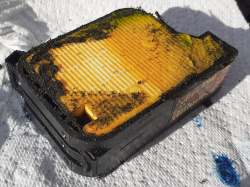
There is some damage to the surface of the sponges from the saw blade, and the black debris on the yellow sponge is plastic ’sawdust‘. Compared to other cartridges I have seen teardowns of such as a recent one by Big Clive the HP-23 cartridge is pretty basic consisting of a sponge in a chamber and basically nothing else. Removing the ink-soaked sponges revealed small filters where ink presumably flows towards the print heads, and these would be looked at closer in more detail later in the day. The sponges were very tightly fitted but otherwise there were no glues or clips holding them in place. The white areas towards the top end suggest that the cartridge had been stored nozzles-down for most of the nine years since it was manufactured.
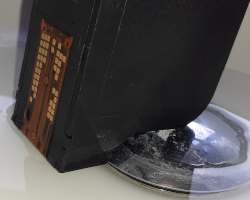
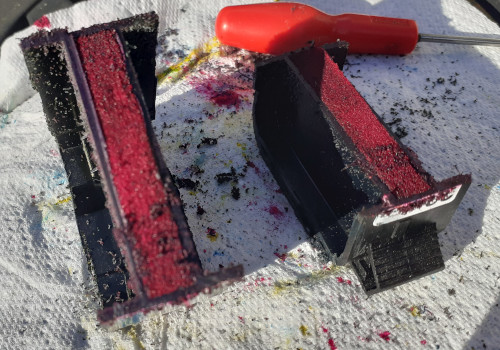
To get into the magenta chamber I decided to simply cut across the remaining chamber width-wise rather than try another longitudinal cut in order to avoid destroying the print head area. It was difficult to get a good picture of what the inside of this chamber looked like once the sponge was pulled out and in any case there was not much to see anyway. Aside from the filter being on the bottom rather than the side it was basically the same as the other two chambers, although the sponge was of a sightly different shape compared to that of the others.
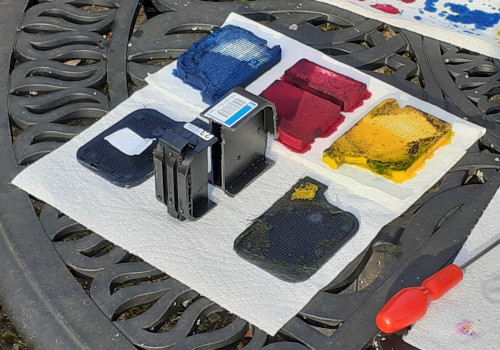
Chamber layout There is no accurate indication on the outside of the cartridge showing which chamber contains which ink so it seemed prudent to lay out an “exploded” view of the cartridge and this is shown below with the top of the cartridge facing the bottom-left corner of the image; the part of the cartridge with the print head is not shown but its place is between the cartridge and the magenta sponge. On the whole the cartridge is of surprisingly basic construction and is also surprisingly robust. The amount of still-wet ink was enough to flow through all the paper towels and onto the table, so it was just as well this was done on a metal table that would not easily be stained.
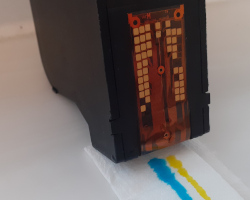
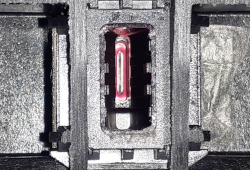
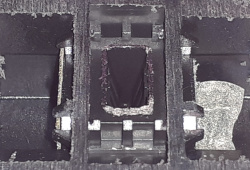
The print head Washing the remains of the cartridge showed magenta flowing out of the print head which indicates that it had become unblocked, so the next stage once it washed and dried was to take a closer look at this part of the cartridge, which was done by cutting off the bottom of the cartridge just short of where the filters are located. I am not sure what the filters are made from but they are the rectangular pieces of white material in the picture below, which also shows where the cartridge was cut in order to get closer access. The filters are well stuck down so it took a lot of time and care to remove them to see what was on the other side of them.
On the other side of the filters are small anti-chambers and within these there is a row of nozzles that appears as a slit — this is easily seen in the central anti-chamber since unlike the other two anti-chambers the filter is directly opposite the nozzles rather than round a corner. Unlike the main ink chambers that are taken up with tightly-packed sponges the anti-chambers are voids that would contain only ink, and upon seeing them my immediate thought was the possibility of drilling a small hile directly into them in order to remove blockages. The pictures below show the central magenta anti-chamber which has a sloped profile.
Fixing the magenta channel
Getting the magenta channel working involves drilling a small hole into the anti-chamber that is between the ink filters and the print head nozzles, and then flushing out this anti-chamber using iso-propyl alcohol in order to clear the blockage. The one place it is possible to create such a hole is on the underside of the cartridge and conveniently two plastic ridges mark where this hole should be bored — horizontally it is right in the middle and vertically the edge of the hole should be a fraction below where the ridges meet the corner. One risk with this procedure is bits of plastic ending up in the anti-chamber and blocking nozzles but I am not sure melting a hole instead of drilling is a viable alternative.
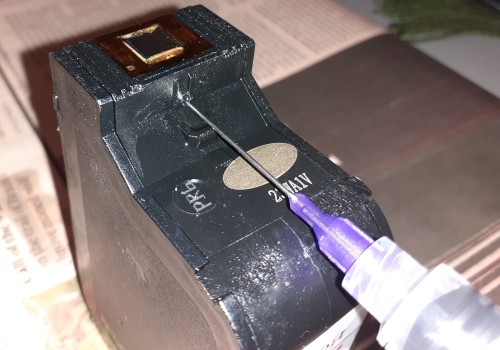
Once the hole has been bored use a syringe with a fine needle is used to wash out the anti-chamber — try various things until ink appears on the outside of the magenta nozzle. The hole will need to be sealed which ideally should be done using hot glue since this would be easy to remove should the anti-chamber need to be cleaned out in the future, which is likley as the magenta channel seems particularly prone to blocking with empty cartridges. At first results were disappointing but a month or so later I noticed the colour balance was changing so went through another round of trying all the tricks and eventually got decent results. Guessing it just takes a while for newly added ink to be absorbed near the print head.
Remarks
The procedures mentioned here may or may not work for you but ultimately this whole experience of getting extra life out of such an old printer has been jumping through hoops for temperamental results, and even when it seems to work manually refilling just too easily becomes a mess. For my actual printing needs colour is really a “nice to have” and during lock-down I survived with mostly no printer access, but even before doing the tear-down I had decided that keeping such an old printer up and running was not worth it in the long-run. I already have a model of colour laser printer in mind and this will be what I will get rather than any more cartridges, remanufactured or new-old stock.