RaspberryPi IPSEC server
04 February 2021Due to circumstances much of my equipment is now at my parents' place in the UK but because of increasingly haphazard travel restrictions I needed to setup remote access just in case I get stuck somewhere else for longer than I plan. For reason of space I decided the best thing was to setup a Strongswan VPN server on a RaspberryPi 4 board, so this article will cover both the process of installing Strongswan and Slackware ARM onto the RaspberryPi, and the setting up of IPSec itself.
Setting up BT Internet
BT is not my favoured ISP but it is the one I have to work with in this instance, and one particular irritation with them is setting up the hub's firewall to pass in all the required traffic. Back in the days I used PowerNet with my own ADSL modem there was no filtering at all, but BT seems to cater for the very non-technical so they have a very expert-unfriendly (i.e. inflexible) offering. UDP/IP ports500 and 4500 need to be opened up — BT does not seem to support opening up non-TCP/UDP ports but Strongswan's NAT-traversal code should be able to detect this and encapsulate things as-needed.
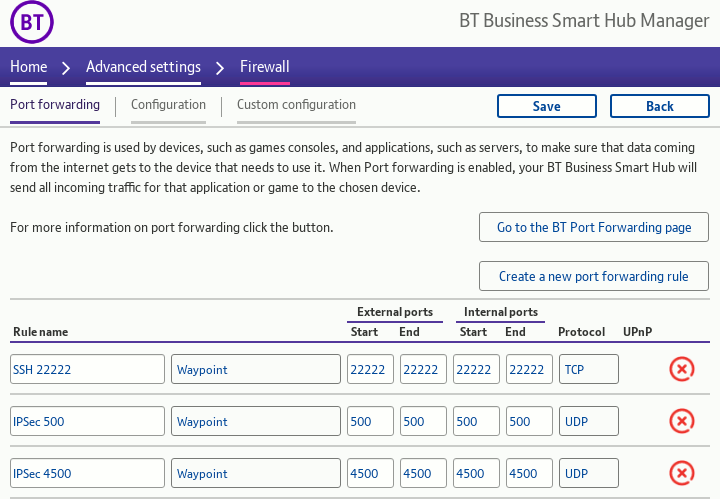
Port 22222 is there purely for non-IPSec testing purposes.
Even thougn the RaspberryPi itself was able to access external IPv6 sites I gave up trying to coax the BT hub into detecting it in order to open up IPv6 ports under pinholes.
Installing Slackware on RaspberryPi
I favour Slackware because it is by any measure a conservative distribution where you could take a setup guide from 15 years ago and most of the information would still be correct with the latest release. The Slackware ARM project has decided not to bother with a build of Slackware 14.2 for the RaspberryPi 4 and instead only provide one forslackware-current which is the development branch — I am not really surprised as Slackware- 14.2 was released back in July 2016 and noises are that the development branch is in some sort of release-candidate stage.
The instructions here are based on those from the SARPi guide and mostly just notes where installation deviates from that of normal workstation Slackware.
Getting the files
For simplicity I decided to simply mirror the entire distribution from the UK mirror using the following two commands. I did not bother passing the-z parameter to rsync because most of the files are already compressed.
wget https://slackware.uk/sarpi/rpi4/current/img/sarpi4-installer_slackcurrent_22Jan21_sp1.img.xz \ https://slackware.uk/sarpi/rpi4/current/pkg/kernel_sarpi4-5.10.9-armv7l-1_slackcurrent_22Jan21_sp1.txz \ https://slackware.uk/sarpi/rpi4/current/pkg/kernel-headers-sarpi4-5.10.9-armv7l-1_slackcurrent_22Jan21_sp1.txz \ https://slackware.uk/sarpi/rpi4/current/pkg/kernel-modules-sarpi4-5.10.9-armv7l-1_slackcurrent_22Jan21_sp1.txz \ https://slackware.uk/sarpi/rpi4/current/pkg/sarpi4-boot-firmware-armv7l-1_slackcurrent_22Jan21_sp1.txz \ https://slackware.uk/sarpi/rpi4/current/pkg/sarpi4-hacks-4.0-armv7l-1_slackcurrent_22Jan21_sp1.txz rsync -av ftp.arm.slackware.com::slackwarearm/slackwarearm-current .
Setting up the MicroSD
If the MicroSD is one that has anything on it stop now — this step will erase everything on it. Using a flash adapter connect the MicroSD card to your system, then unpack and flash the provided installer image to the MicroSD using the following command, replacing/dev/sdX with whatever fdisk -l indicates is the block device for the flash card.
Take care to use the correct device unless you want a very bad day.
xz -dc sarpi4-installer_slackcurrent_22Jan21_sp1.img.xz | dd of=/dev/sdX bs=65536
Get a network connection
In my case I decided to do a network install, which can be setup using the commands below, replacing the IP addresses with ones appropriate for your ISP. The nameserver8.8.8.8 is Google's nameserver, which can usually be left as-is.
ifconfig eth0 192.168.1.16 netmask 255.255.255.0 up route add default gw 192.168.1.254 echo nameserver 8.8.8.8 > /etc/resolv.conf
May as well update the clock as well while here:
ntpd -p pool.ntp.org
Creating & setting up partitions
Nothing particularly special here — usingcfdisk to create swap and root partitions, and any others like /home depending on taste.
I decided to make the swap partition of 1GB although I doubt that it will ever be used in practice so it probably could be made smaller or omitted entirely.
One thing to watch out for in the partition part of the setup program is mounting the W32 FAT32 parition as /boot as things will screw up sooner or later down the line if you omit to do this.
Choosing packages
The general idea is to connect to the RasapberryPi using SSH rather than having a physical display connected once it has been boot-strapped, so only four disk-sets are required:A, D, L, and N.
With a 16GB SD card there will be ample space to do a full install of these four, but with an 8GB one things will be a bit tight — in this latter case some large individual packages such as MariaDB and Rust will have to be individually deselected.
Completing the installation
When the setup program reaches theSETUP COMPLETE stage and it is time to exit the installer, Do Not Reboot.
At this stage a bit of manual work is needed to remove some redundant packages and install some critial RaspberryPi-specific ones. In short the following, replacing /dev/mmcblk0p1 with whatever the block device for the W32 FAT32 boot parititon is on, if it is different:
ROOT=/mnt removepkg kernel_armv7 kernel-modules-armv7 mount -t vfat /dev/mmcblk0p1 /mnt/boot rm /mnt/boot/initrd.gz ROOT=/mnt installpkg /rpi-extra/kernel* /rpi-extra/sarpi4-*
Now you can reboot.
reboot
At this stage you should have a newly-provisioned Slackware ARM install.
Building Strongswan for Slackware
Originally I planned to cross-compile Strongswan but parameters such as--with-sysroot that are supposed to aid cross-compiling are basically broken, and I decided the effort needed to get around complications was not worth it.
To build and install Strongswan directly on the RaspberryPi itself is relatively straightforward:
./configure --prefix=/opt/strongswan \ --enable-eap-identity --enable-eap-md5 --enable-eap-mschapv2 --enable-eap-tls \ --enable-eap-ttls --enable-eap-peap --enable-eap-tnc --enable-eap-dynamic \ --enable-eap-radius --enable-farp make -j4 make install
Using all four CPU cores building should only take a few minutes and use about 200MB or so of storage.
Strongswan setup
Unlike with my previous IKEv2 VPN guide from 2017 I have opted to use client certificates, as I am rather averse to using passwords to secure important assets. If you want certificates for just server verification and use username/password pairs for client authentication have a look at EAP Hybrid Mode in the previous IKEv2 VPN guide.Creating certificates
For creating the certificate and keys the following makefile will do the task, although values given by--dn and --san parameters will need to be changed to match your own systems:
IPSEC=/usr/sbin/ipsec all: server.cert.pem client.cert.pem cakey.pem: $(IPSEC) pki --gen --outform pem > $@ cacert.pem: cakey.pem $(IPSEC) pki --self --in $< \ --dn "C=UK, OU=VPN, O=MyVPN, CN=Mine VPN CA" \ --ca --outform pem > $@ server.key.pem: $(IPSEC) pki --gen --outform pem > $@ server.key.pub: server.key.pem $(IPSEC) pki --pub --in $< --outform pem > $@ server.cert.pem: cacert.pem cakey.pem server.key.pub $(IPSEC) pki --issue --cacert cacert.pem --cakey cakey.pem \ --dn "C=UK, OU=VPN, O=MyVPN, CN=VPN" \ --san "vpn.example.com" \ --flag serverAuth --flag ikeIntermediate \ --in server.key.pub --outform pem > $@ client.key.pem: $(IPSEC) pki --gen > $@ client.key.pub: client.key.pem $(IPSEC) pki --pub --in $< --outform pem > $@ client.cert.pem: client.key.pub $(IPSEC) pki --issue --cacert cacert.pem --cakey cakey.pem \ --dn "C=UK, OU=VPN, O=MyVPN, CN=Client" \ --in $< --outform pem > $@ client.p12: client.cert.pem client.key.pem cacert.pem openssl pkcs12 -in client.cert.pem -inkey client.key.pem \ -certfile cacert.pem -export -out $@
For getting client.p12 on to an Android mobile the easiest thing I found was to out it onto an internal web-server then download it.
Android seems to be smart enough to ask if you want to place it into the certificate store, although at least some earlier versions will require you to have a certain level of lock screen security before imporitng them.
As for the server certificates & keys copy them to where Strongswan will pick them up:
cp cacert.pem /opt/strongswan/etc/ipsec.d/cacerts/ cp server.key.pem /opt/strongswan/etc/ipsec.d/private/ cp server.cert.pem /opt/strongswan/etc/ipsec.d/certs/
Authentication setup
In order to setup the VPN configuration put the following intoipsec.conf changing the leftid and IP address parameters as needed.
Most required parameters have the required values as default, so they can be omitted.
config setup conn certvpn auto=add type=transport keyexchange=ikev2 leftsubnet=0.0.0.0/0,::/0 leftauth=pubkey leftcert=server.cert.pem leftid="C=UK, OU=VPN, O=MyVPN, CN=VPN" right=%any rightsourceip=192.168.1.128/28 # rightsubnet=10.0.0.0/8 # If used, would route 10.x.x.x thru client..
To instead get an IPv6 address within the LAN change rightsourceip to something like fc01::64:0/8.
Specifying both an IPv4 and IPV6 subnet seems to result in virtual IP addresses for both being created, but only one of them is pingable for some reason.
In ipsec.secrets the following specifies the server's private key:
: RSA server.key.pem
Running Strongswan server
To run Strongswan server in the foreground use the following:/opt/strongswan/sbin/ipsec start --nofork --debug-all
For normal background running, omit --nofork and --debug-all.
Stopping the sever can be done using:
/opt/strongswan/sbin/ipsec stop
You may want to put the above commands into /etc/rc.d/rc.local and /etc/rc.d/rc.local_shutdown so that Strongswan is started and shut down when the system is bought up and taken down.
Client setup
On the client machine use the following/etc/ipsec.conf snippet:
config setup conn VPNconn keyexchange=ikev2 auto=add left=%any leftsourceip=%config leftcert=client.cert.pem leftfirewall=yes right=vpn.example.com rightid="C=UK, OU=VPN, O=MyVPN, CN=VPN" rightauth=pubkey rightsubnet=0.0.0.0/0,::/0
The client private key is specified in /etc/ipsec.secrets as shown below.
If this key is encrypted the passphrase would also be specified here.
: RSA client.key.pem
The VPN connection can then be controlled using the following commands:
ipsec start ipsec up VPNconn ipsec down VPNconn ipsec stop
Potential issues & loose ends
Adding second IP address
If for whatever reason you need to attach extra IP addresses to an interface, commands such as the following can be placed into/etc/rc.d/rc.local where they will be run towards the end of the boot process.
Slackware does not really provide for static IPv6 addresses in its traditional /etc/rc.d/rc.inet1.conf and I have a long-standing dislike of NetworkManager, so any required IPv6 addresses not assigned via DHCP will need to go into here as well.
ifconfig eth0:1 192.168.1.16 netmask 255.255.255.0 up
Stroke vs. VICI based configurations
Even though Strongswan considers theipsec command as legacy and instead prefers the swanctl interface which at a glance looks more intuitive in its choice of nomenclature, I am not entirely convinced it is worth the effort of rewriting everything into the new configuration format having worked out how to get the old format to do what I want.
This is a bullet I will have to bite at some point, but for the time being the old interface seems to be fully supported, at least for the functionality I require.
Routing issues
When Strongswan is built with the--enable-farp option it will sniff for ARP requests for client addresses and emit a fake ARP response so that other machines on the LAN can be communicated with.
If the address pool for client IPs is not within the LAN subnet and Strongswan is not running on the default gateway, then somehow these other machines need to have a routing table entry that forwards to the VPN server.
Also, if the remote client can be pinged from the VPN gateway but no traffic is being passed between the VPN server and other machines, the odds are that Fake ARP was not enabled and instead NAT Masquerading will need to be used instead with a firewall rule along the lines of:
iptables -t nat -A POSTROUTING -s 192.168.64.128/24 -o eth0 -j MASQUERADE
DNS issues
If you are having problems with name resolution you might want to use Google's public DNS servers which are8.8.8.8 and 8.8.4.4, as these will always be useable regardless of which ISP and/or VPN server is in use.